Ryuhei
Y-Designs, Inc is a web design and development company based out of Seattle, Washington USA.
We believe in simple yet functional design, interfaces that work, and meaningful content. Our services also include branding, logo design, photography, web technical support, graphic design, and SEO.
K2 Images & Quality
Preparing Images
- When preparing images to upload, you should always resize the image to be either the exact size or a few pixels larger than its dimensions on your website.
- Never resize an image smaller than its dimensions on your website. This degrades the image.
Media Manager vs. Image Tab
There are two ways in which images can be uploaded using K2, the Media Manager and the Image Tab.
Media Manager
The Media Manager is used when you want to upload an image directly into the text field of a category or item. This requires you to upload your image into the media manager, and then insert the image (which is now stored in the media manager) into your text field.
Image Tab
Images uploaded via the Image Tab usually function as the main image of the category or item. When uploading images via the Image Tab, you can upload directly from your computer without having to store it in any sort of Media Manager.
There can only be one image per item/category uploaded via the Image Tab.
Uploading Images via Media Manager
1) Open the Media Manager
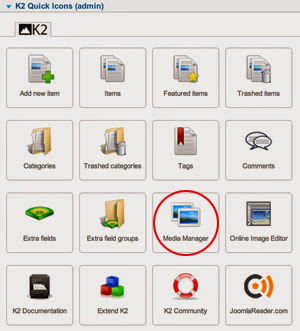
- When you are ready to upload your images, click on the Media Manager selection under your K2 menu (displayed below in red).
2) Create a folder
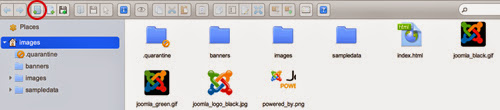
- It is esential to create folders and organize your images. In the upper left portion of the menu bar click on the “New Folder” button, marked by a folder with a green “plus” sign (displayed below in red).
- If necessary, create folders within folders in order to organize your images. Typically, you will create a folder for each page (home, blog, about etc.) and within those folders you may have other folders that specify a certain date, title, section etc.
3) Upload files
- To the right of the “New Folder” button is the “Upload Files” button, marked by a disk with a green “plus” sign (displayed below in red).
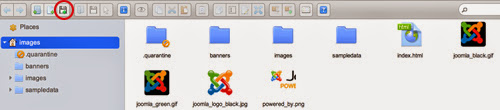
- This button will direct you to a window where you can select the file(s) you want to upload. After locating and selecting your files, click “Open” and your files will upload.
4) Placing Images In K2 Items or Categories
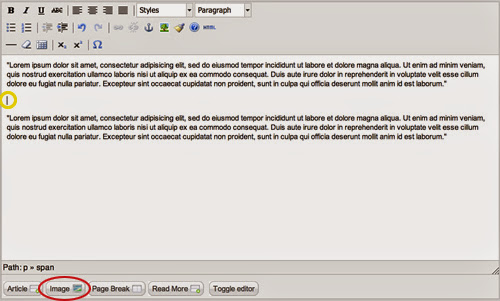
- You can now place your images in a K2 Item or Category. Once you open up a K2 Item/Category, use your cursor to click on the area in the text field where you want the image to be placed (displayed below in yellow). Click on the “Image” button, located towards the bottom left of the text field (displayed below in red).
- You will now see a popup similar to the one below.
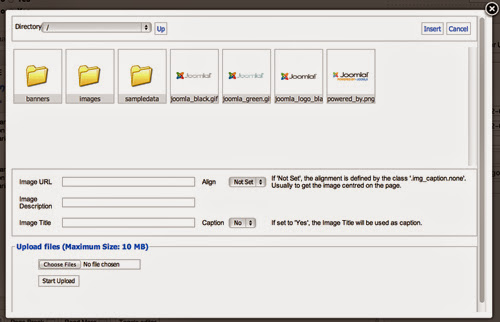
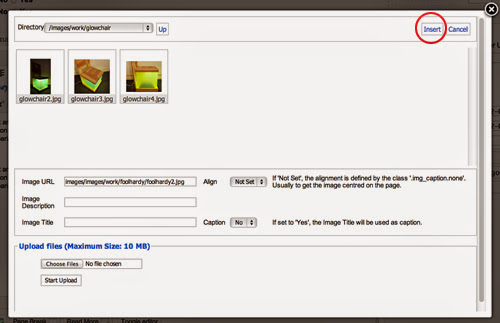
- Select the folder(s) where you placed your image. Once you have found your image, click on it and select the “Insert” button in the upper right hand corner of the popup (displayed below in red). You can add an image description and title in the marked fields, located below the image thumbnails. You can also select “Yes” under the “Caption” field in order to display the image title as a caption.
- Make sure to click on the “Save” button in the “Edit Items” screen and your image will now be uploaded.
Uploading Images via Image Tab
- Aside from placing images in the text field, you can also upload an image via the image tab located next to the content/description tab (displayed below in red).
- As noted previously, there can only be one image per item/category uploaded in this manner. This image is usually the main image for the given item/category.
- Select “Choose File” (displayed below in yellow) and find the file on your computer.
- When uploading images in this manner, you do not have to place the image in the media manager. You can simply locate the image on your computer.

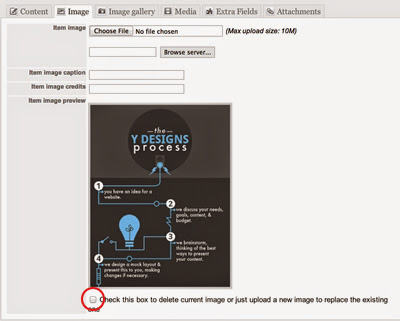
- If you would like to delete your main image, check the box located at the bottom (displayed below in red), and click the orange save button.
K2 Items
by: Ryuhei Yokokawa
Accessing K2 Items
1) Login to administrative back-end for your website.
- Open your browser and go to: www.yoursite.com/administrator.
- Type in your username and password and log in.
2) Select K2 Items
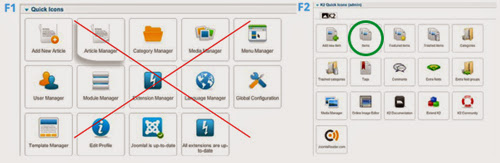
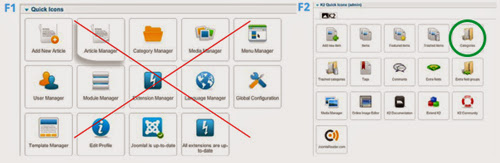
- If your Administration page is showing a “Quick Icons” listing as in figure 1 below, do not use this. Instead, click on the “K2 Quick Icons” drop down menu, located below the “Quick Icons” listing (figure 2).
- Click on the “Items” button in the “K2 Quick Icons” listing (displayed below in green).
Change/Create a New K2 Item
Create New K2 Item - Click on the "New" button, located towards the upper right corner and marked by an orange and white "plus" sign. (displayed below in red).
Edit Existing K2 Item - Select the item you would like to edit from the item listing (displayed below in yellow).

Important Note About Saving Changes!
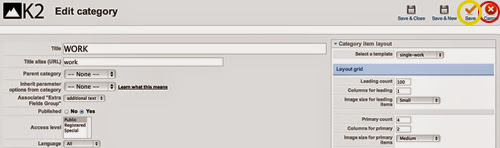
- Whenever you make changes in K2, remember to click the “Save” button, marked by an orange check (displayed below in yellow).
- After saving your changes, in order to leave the Edit Items page, click on the “Cancel” button, marked by a red and white “x” (displayed below in red).
- You can expedite the process by clicking the “Save & Close” or “Save & New” buttons depending on if you want to save and return to the menu or save and create a new item.

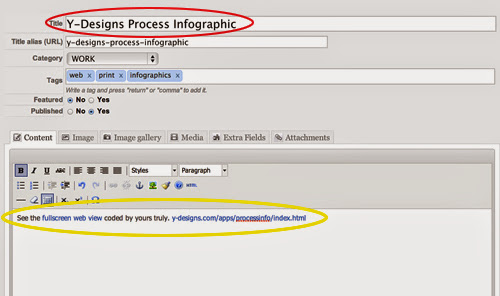
Titles and Descriptions
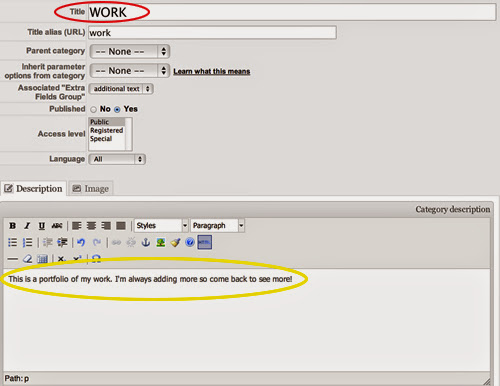
- You can modify the title and/or description via the title text field (displayed below in red) and the description text field (displayed below in yellow).
Uploading Images
For a more detailed description of how to upload, edit, and prepare images, please see our tutorial on "IMAGES & QUALITY".
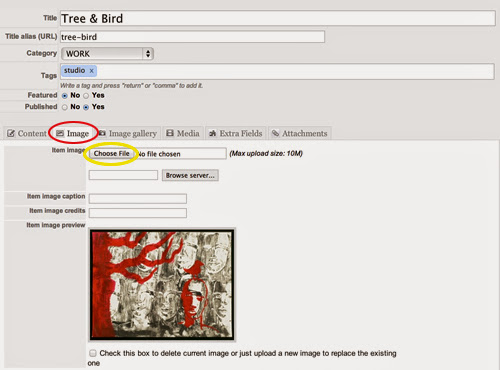
- You can upload an image via the image tab located next to the content/description tab (displayed below in red).
- Just simply select “Choose File” (displayed below in yellow) and find the file on your computer.
- If you would like to delete your image, check the box located at the bottom, and click the orange save button.
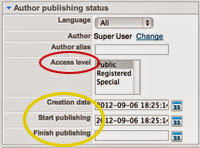
Editing Your Author Publishing Status
Under the "author publishing status" drop menu, located on the right side of the page, you can edit many publishing features.
- If your website has features that restrict access for some users, you can change access levels for each item using the “Access level” field (displayed below in red).
- You can also edit many publishing dates (displayed below in yellow). These include “Creation Date” (date your item was created), “Start publishing” date (date you want your item to go public), and “Finish Publishing” date (date you want your item to no longer be visible to the public).
- We advise that you do not change these settings unless you specifically want to set certain time constraints for your items.
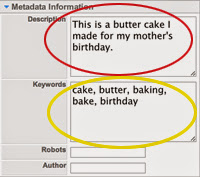
Search Engine Optimization (SEO)
Under the "metadata" drop menu, located on the right side of the page, you can edit many features to help with your website's SEO.
- You can include descriptions (displayed in red below) and keywords (displayed in yellow below) in order to improve your search engine optimization.
- Unless you fully understand how SEO works, we advise that you do not enter anything in the “Robots” field.
K2 Categories
by: Ryuhei Yokokawa
Accessing K2 Categories
1) Login to administrative back-end for your website.
- Open your browser and go to: www.yoursite.com/administrator.
- Type in your username and password and log in.
2) Select K2 Categories
- If your Administration page is showing a “Quick Icons” listing as in figure 1 below, do not use this. Instead, click on the “K2 Quick Icons” drop down menu, located below the “Quick Icons” listing (figure 2).
- Click on the “Categories” button in the “K2 Quick Icons” listing (shown below in green).
Change/Create a New K2 Category
Create New K2 Category - Click on the “New” button, located towards the upper right corner and marked by an orange and white “plus” sign. (displayed below in red).
Edit Existing K2 Category - Select the category you would like to edit from the category listing (displayed below in yellow).

Important Note About Saving Changes!
- Whenever you make changes in K2, remember to click on the “Save” button, marked by an orange check (displayed below in yellow).
- After saving your changes, in order to leave the Edit Category page, click on the “Cancel” button, marked by a red and white “x” (displayed below in red).
- You can expedite the process by clicking the “Save & Close” or “Save & New” buttons depending on if you want to save and return to the menu or save and create a new category.
Titles and Descriptions in K2 Categories
- You can modify the title and/or description via the title text field (displayed below in red) and the description text field (displayed below in yellow).
- Titles and descriptions may or may not be used depending on how your site is configured.
Uploading Images
For a more detailed description of how to upload and edit images, please see our tutorial on "IMAGES & QUALITY".
- You can upload an image via the image field located next to the content/description tab (displayed below in red).
- Just simply select “Choose File” (displayed below in yellow) and locate the file on your computer.
- If you would like to delete your image, check the box located at the bottom (displayed below in blue), and click the orange save button.
