K2 Items
by: Ryuhei Yokokawa
Accessing K2 Items
1) Login to administrative back-end for your website.
- Open your browser and go to: www.yoursite.com/administrator.
- Type in your username and password and log in.
2) Select K2 Items
- If your Administration page is showing a “Quick Icons” listing as in figure 1 below, do not use this. Instead, click on the “K2 Quick Icons” drop down menu, located below the “Quick Icons” listing (figure 2).
- Click on the “Items” button in the “K2 Quick Icons” listing (displayed below in green).

Change/Create a New K2 Item
Create New K2 Item - Click on the "New" button, located towards the upper right corner and marked by an orange and white "plus" sign. (displayed below in red).
Edit Existing K2 Item - Select the item you would like to edit from the item listing (displayed below in yellow).

Important Note About Saving Changes!
- Whenever you make changes in K2, remember to click the “Save” button, marked by an orange check (displayed below in yellow).
- After saving your changes, in order to leave the Edit Items page, click on the “Cancel” button, marked by a red and white “x” (displayed below in red).
- You can expedite the process by clicking the “Save & Close” or “Save & New” buttons depending on if you want to save and return to the menu or save and create a new item.

Titles and Descriptions
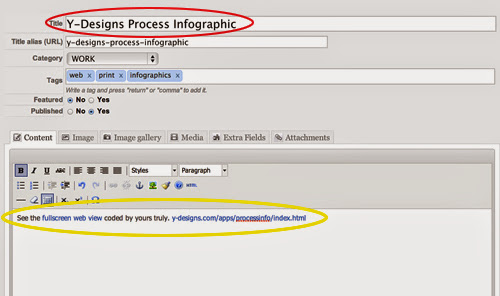
- You can modify the title and/or description via the title text field (displayed below in red) and the description text field (displayed below in yellow).

Uploading Images
For a more detailed description of how to upload, edit, and prepare images, please see our tutorial on "IMAGES & QUALITY".
- You can upload an image via the image tab located next to the content/description tab (displayed below in red).
- Just simply select “Choose File” (displayed below in yellow) and find the file on your computer.
- If you would like to delete your image, check the box located at the bottom, and click the orange save button.

Editing Your Author Publishing Status
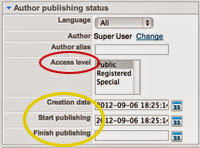
Under the "author publishing status" drop menu, located on the right side of the page, you can edit many publishing features.
- If your website has features that restrict access for some users, you can change access levels for each item using the “Access level” field (displayed below in red).
- You can also edit many publishing dates (displayed below in yellow). These include “Creation Date” (date your item was created), “Start publishing” date (date you want your item to go public), and “Finish Publishing” date (date you want your item to no longer be visible to the public).
- We advise that you do not change these settings unless you specifically want to set certain time constraints for your items.

Search Engine Optimization (SEO)
Under the "metadata" drop menu, located on the right side of the page, you can edit many features to help with your website's SEO.
- You can include descriptions (displayed in red below) and keywords (displayed in yellow below) in order to improve your search engine optimization.
- Unless you fully understand how SEO works, we advise that you do not enter anything in the “Robots” field.
